Materials:
- Cardboard (file cards, old cereal box, poster board, etc.)
- Scissors
- Crayons (optional)
Procedure:
- Cut (or let the child cut) shapes of varying sizes. Have some that are the “same” and some that fit together to make a bigger whole.
For example: Make 5 large squares. Cut one from corner to corner, making 2 triangles. Cut another into the 2 triangles; then cut both triangles from point to the center of the other side to make 2 smaller triangles. Cut another square down the center to make 2 rectangles. Cut one down the center to make squares. Cut one square to make 4 smaller squares. Leave one big square whole. Cut some circles of different sizes. Any combination you do is fine. Show the children how the 4 small squares = the large square, the 2 small triangles = the larger triangle, and the 4 small or 2 larger triangles = the larger square. The 2 rectangles = the large square. - Give the children the shapes. (Explain that this is a game where they can make pictures over and over, but that when they are through, they will put the shapes all back in the envelope (or box), for another day. If they understand, ahead of time, that these pictures are not glued and kept but are just for fun and then can be used to make new pictures, they hopefully won’t be upset when their creation doesn’t stay put.) Name each shape as you give it to them. Let the children name each shape that they know.)
- You can give each child a piece of paper to work on or let them work directly on the table, a tray, or on the floor.
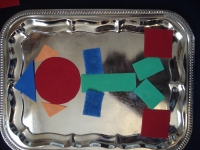
- Tell them that they can take the shapes and make any creation they want! “Let’s see what kind of picture you can make out of these shapes!”
- If they seem confused, you can do it with them for a few minutes to give them some ideas. Talk about, “What does this square make you think of?” (house, car, present, etc.) “What could this triangle be?” (Sail for a boat, bird’s head, hat, roof for a house, etc.)
- Encourage any attempts they make. Tell them “You are being creative!” (For small children, seeing a circle as a face or as a tree top is creative! Tell them so.) Encourage them as they work (or if they’re concentrating well and don’t want you to see their unfinished work, genuinely praise them when it is completed, and tell them how well they concentrated.)
- Don’t help unless they need it and then only to get them going. We want them to learn to create. Some children are happy to let you think of everything. Encourage them to try.
What gets developed?
- Develops skills in discriminating between shapes that are “alike” and “different.”
- Teaches concepts: big, little, part, whole, square, triangle, circle, rectangle, etc.
- Develops creativity.
- Helps small muscle development and control as the child manipulates the shapes.
Related blogs posts:

